Sentiment Analysis with Python: Step-by-Step Guide Using NLTK and Naive Bayes
Sentiment analysis is a key technique in Natural Language Processing (NLP) used to determine whether a given piece of text expresses a positive or negative sentiment. In this project, we build a sentiment analysis model that can classify movie reviews as positive or negative using the Naive Bayes algorithm. This simple machine learning application uses NLTK, scikit-learn, and Python’s built-in tools.
Let’s go through the full code — step by step.
1. Import Essential Libraries
To build our sentiment analysis model, we need to import a few essential Python libraries. These libraries help us handle text data, build machine learning models, and evaluate their performance.
- nltk: A popular library for natural language processing tasks. We’ll use it to load a dataset of movie reviews.
- sklearn: Short for scikit-learn. It provides powerful tools for machine learning, including vectorization, classification, and evaluation.
These libraries are widely used and well-documented, making them ideal for beginners.
# 1. Import Essential Libraries
import nltk
from nltk.corpus import movie_reviews
from sklearn.feature_extraction.text import CountVectorizer
from sklearn.naive_bayes import MultinomialNB
from sklearn.pipeline import make_pipeline
from sklearn.model_selection import train_test_split
from sklearn.metrics import accuracy_score
2. Download the Movie Reviews Dataset
Before using the dataset, we need to download it using nltk.download(). The dataset contains 2,000 movie reviews, each labeled as either positive or negative. This is the labeled data we will use to train our model.
The movie_reviews dataset is built into NLTK, so we don’t need to search for or manually upload any files. This makes it an excellent choice for simple machine learning projects.
# 2. Download dataset
nltk.download("movie_reviews")
3. Load the Movie Reviews and Assign Sentiment Labels
In this step, we load all the reviews and their sentiment labels. We store the data in two separate lists: one for the review texts and one for the labels. This prepares the data for the training process. Each label will be converted to a number:
- 1 for positive
- 0 for negative
# 3. Load texts and labels from the movie_reviews dataset
texts = []
labels = []

for category in movie_reviews.categories():  # 'pos' or 'neg'
    for fileid in movie_reviews.fileids(category):
        review_text = movie_reviews.raw(fileid)  # Get full text
        texts.append(review_text)
        labels.append(1 if category == "pos" else 0)  # Convert to 1/0
4. Split the Dataset into Training and Test Sets
To test our model fairly, we divide the dataset into two parts:
- One part (80%) will be used to train the model.
- The other part (20%) will be used to test how well the model performs on new, unseen data.
Using a test set helps us check if the model is learning general patterns or just memorizing the training data.
# 4. Split into training and test sets
X_train, X_test, y_train, y_test = train_test_split(
    texts, labels, test_size=0.2, random_state=42)
5. Build the Machine Learning Pipeline
In this step, we create a pipeline that handles both text processing and classification.
CountVectorizer() – Convert Text into Numbers Using the Bag of Words Model
To make text understandable for a machine learning model, we must first convert it into numbers. This is exactly what CountVectorizer() does.
It uses a method called the Bag of Words model, which turns each review into a vector of word counts. It does this by:
- Looking at all the unique words across all reviews,
- Counting how many times each word appears in each review,
- And creating a table (matrix) of these word frequencies.
This numeric format is essential because machine learning algorithms can’t work with raw text — they need numerical input. The Bag of Words model is one of the most popular and beginner-friendly approaches for text classification tasks.
MultinomialNB() – Multinominal Naive Bayes
MultinomialNB() is a Naive Bayes classifier that works well for text data. It learns which words are more common in positive or negative reviews.
Using make_pipeline() keeps the code clean and makes sure the same steps are applied to all future data.
# 5. Build model pipeline: vectorizer + classifier
model = make_pipeline(CountVectorizer(), MultinomialNB())
6. Train the Sentiment Analysis Model
Once the data is ready, we need to teach our model how to recognize patterns in it. This is done with the fit() function.
Here’s what really happens during this step:
- The model analyzes the training reviews (X_train) and their correct labels (y_train).
- It learns which words are more common in positive reviews and which ones appear more often in negative ones.
- Using this knowledge, it builds a statistical model to predict sentiment for future reviews.
This is the core step of machine learning — where the algorithm learns from examples and builds the ability to make predictions. Without training, the model would have no understanding of how to classify new data. That’s why the fit() method is a crucial part of every machine learning project.
# 6. Train model
model.fit(X_train, y_train)
7. Evaluate the Model’s Accuracy
After training, we test the model on the test set to see how well it performs. The accuracy_score() function shows what percentage of predictions were correct. This gives us a simple way to measure how effective the model is.
A good model should have an accuracy above 75%. In our case, it usually performs between 80–85%, which is excellent for a simple approach like this.
# 7. Evaluate
predictions = model.predict(X_test)
print("Accuracy:", accuracy_score(y_test, predictions)*100,"/ 100")
8. Test the Model on Custom Reviews
Let’s now test the model on some new review texts. These are not part of the training or test data. The model will predict whether each review is positive or negative based on what it has learned.
This is a fun way to see your model in action with real-world examples!
# 8. Try sample reviews
samples = [
    "The movie was amazing! I loved it.",
    "Worst film ever. So boring and badly acted.",
    "I loved this movie, it was fantastic!",
    "An excellent film, very enjoyable.",
    "Absolutely wonderful! Great acting.",
    "It was boring and too long.",
    "Terrible movie, I hated it.",
    "Best movie I have seen this year!",
    "Awful plot and poor performance.",
    "Really inspiring and beautiful story.",
    "Not good, really disappointing.",
    "A masterpiece. Totally worth watching!"
]
results = model.predict(samples)
for text, label in zip(samples, results):
    print(f"'{text}' → {'Positive' if label == 1 else 'Negative'}")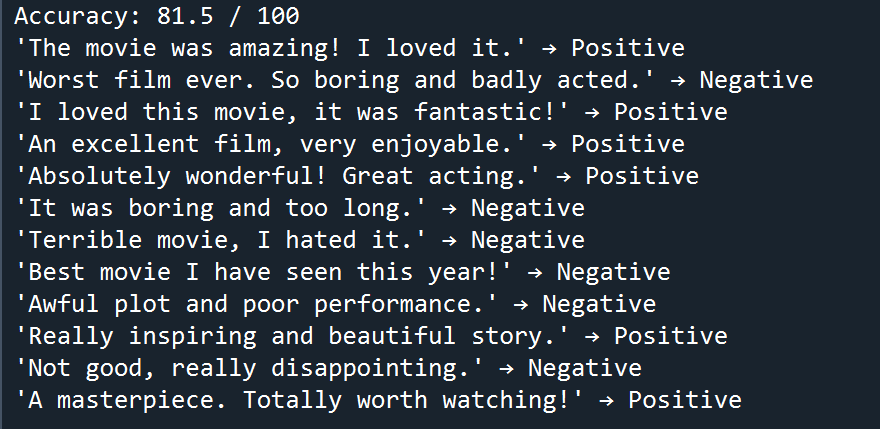
You’ve just built a complete sentiment analysis project in Python — from loading a dataset to training a model and testing it with new data. Using tools like NLTK, CountVectorizer, and Naive Bayes, we created a working text classifier with just a few lines of code.
Recap:
- Used NLTK’s built-in dataset of movie reviews
- Converted raw text into bag-of-words vectors
- Trained a Naive Bayes classifier
- Evaluated performance using accuracy
- Tested model predictions with custom reviews
This project is perfect for beginners and can be expanded with:
- TF-IDF vectorization for better feature scaling
- Stopword removal and stemming
- Advanced classifiers like Logistic Regression or SVM
Feel free to reach out via email or connect with me on LinkedIn. I’ll do my best to get back to you as soon as possible.
Best Regards,
Can Ozgan