Handwritten Digit Recognition with KNN in Python (MNIST Dataset, 90%+ Accuracy)
In this beginner-friendly machine learning tutorial, you’ll learn how to recognize handwritten digits using Python and the MNIST dataset. We’ll use the K-Nearest Neighbors (KNN) algorithm, one of the simplest yet effective classifiers, to predict digits with over 90% accuracy. This project is a great way to practice with real-world image data, model training, and accuracy evaluation — all in under 50 lines of code!
Let’s dive in!
1. Importing Essential Python Libraries
To build our handwritten digit recognition model, we first import the necessary Python libraries. Each of these plays a crucial role in different stages of the machine learning workflow:
- Scikit-learn: It is one of the most popular and beginner-friendly machine learning libraries in Python. It provides a wide range of tools for classification, regression, clustering, model evaluation, and data preprocessing.
- TensorFlow (Keras Datasets Module): It is a powerful open-source deep learning framework developed by Google. While we’re not building a neural network in this project, we use the mnist dataset from its Keras Datasets module.
- Matplotlib: It is a well-known plotting library in Python. It allows us to create visualizations, such as displaying images and drawing graphs. In this project, we use matplotlib.pyplot to visualize digit images and show the predicted vs. actual labels.
# 1. Import Essential Python Libraries
from sklearn.neighbors import KNeighborsClassifier
from sklearn.metrics import accuracy_score
from sklearn.model_selection import train_test_split
from tensorflow.keras.datasets import mnist
import matplotlib.pyplot as plt
2. Load the MNIST Dataset
We use the mnist module from TensorFlow, which contains 70,000 grayscale images of handwritten digits (0–9). Each image is 28×28 pixels.
# 2. Load MNIST dataset (28x28 grayscale images, handwritten digits)
(X_train, y_train), (X_test, y_test) = mnist.load_data()
3. Flatten the Image Data
Machine learning algorithms like KNN require one-dimensional input. We reshape each 28×28 image into a 784-length vector and normalize the pixel values to the range [0, 1].
# 3. Flatten the 28x28 images into 784-length vectors
X_train_flat = X_train.reshape(-1, 28*28) / 255.0
X_test_flat = X_test.reshape(-1, 28*28) / 255.0
4. Use a Subset (Optional but Recommended)
Because KNN is a distance-based algorithm, it can be slow on large datasets. We select a smaller subset (10,000 training samples and 1,000 test samples) for faster processing.
# 4. Use a subset if needed (KNN is slow on large sets)
X_train_sub, _, y_train_sub, _ = train_test_split(X_train_flat, y_train, train_size=10000, stratify=y_train, random_state=42)
X_test_sub, _, y_test_sub, _ = train_test_split(X_test_flat, y_test, test_size=1000, stratify=y_test, random_state=42)
5. Train the KNN Classifier
We use KNeighborsClassifier from Scikit-learn with k=3. The k in KNeighborsClassifier(n_neighbors=3) refers to the number of neighbors the algorithm looks at when making a prediction. This means the model looks at the 3 closest training samples when making predictions.
Here’s how it works:
- When the model receives a new, unseen data point (like a digit image from the test set), it compares this point to all the training data.
- It calculates the distance (usually Euclidean distance) between the new point and every training sample.
- It then finds the 3 closest training samples — these are the “3 nearest neighbors.”
- The model then looks at the labels of these 3 neighbors (e.g., digits 2, 2, and 3).
- It chooses the most common label among the neighbors — in this case, it would predict 2.
# 5. Train the KNN classifier
model = KNeighborsClassifier(n_neighbors=3)
model.fit(X_train_sub, y_train_sub)
6. Make Predictions and Evaluate Accuracy
We predict on the test subset and evaluate accuracy using accuracy_score. In this case, the model achieves 90% accuracy.
# 6. Predict and evaluate
y_pred = model.predict(X_test_sub)
accuracy = accuracy_score(y_test_sub, y_pred)
print(f"Model accuracy on MNIST: {accuracy * 100:.2f}%")
At the time of writing this article, the test yielded the following result: “Model accuracy on MNIST: 94.56%”.
7. Visualize Predictions
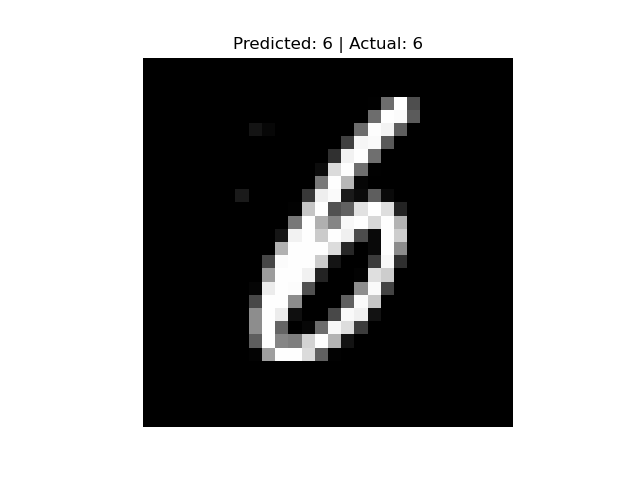
Using Matplotlib, we visualize the random sample along with the predicted and actual labels. This visualization helps validate how well the model performs.
# 7. Show example predictions
i=90
plt.imshow(X_test_sub[i].reshape(28, 28), cmap="gray")
plt.title(f"Predicted: {y_pred[i]} | Actual: {y_test_sub[i]}")
plt.axis("off")
plt.show()
You can also look at other numbers by changing the value of i.
In this project, you built a simple yet effective handwritten digit recognition system using Python, Scikit-learn, and the MNIST dataset. The K-Nearest Neighbors algorithm achieved over 90% accuracy, making it a great choice for quick prototyping and learning how image classification works.
Feel free to reach out via email or connect with me on LinkedIn. I’ll do my best to get back to you as soon as possible.
Best Regards,
Can Ozgan